 Skip to content
 Collaboration Insights at a Glance
- Successful custom fence engineering hinges on transparent, detailed communication and structured project workflows.
- Implementing clear design briefs, technical specifications, and formal revision processes drastically reduces errors and enhances quality.
Overview of Custom Fence Collaboration
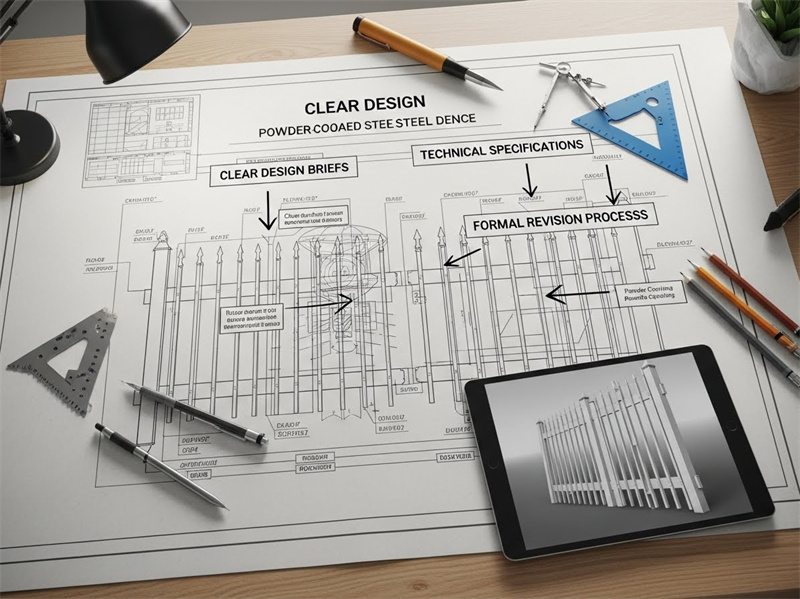
Successful custom fence engineering is not merely a transaction; it’s a deep, strategic partnership between a client and a manufacturer. The goal extends beyond simple fabrication to co-creating a solution that meets precise performance, aesthetic, and budgetary requirements. Achieving this requires a robust framework for collaboration from day one. Fundamentally, early and detailed alignment on the project’s scope and the rules of engagement is the single most effective strategy to prevent costly rework, mitigate delays, and ensure the final product is not just built, but engineered for long-term success. A fence is an engineered system, and any misstep in its foundational specifications can cascade into significant structural, financial, and timeline challenges that are far more difficult to correct later in the process.
Why Collaboration Matters in Custom Fencing
Custom fence projects often involve complexities far beyond standard residential installations. They may require specific wind load capacities, unique material integrations, intricate gate automations, or adherence to stringent security or historical district regulations. This level of precision demands more than a simple purchase order; it requires a shared understanding of the design intent and manufacturing realities. Without strong collaboration, the risks are substantial. Miscommunication is a primary driver of cost overruns, timeline slips, and critical quality failures. As industry reports from organizations like the Construction Management Association of America consistently show, effective manufacturer collaboration is directly linked to a reduction in project delays and budget deviations.
The benefits of a strong partnership are mutual. For the client—be it an architect, contractor, or developer—it means predictable outcomes, higher quality, and greater satisfaction with a product that performs as designed. For the manufacturer, it leads to improved efficiency, reduced material waste from errors, and a stronger reputation as a reliable partner. In an industry where standards for performance and safety are continually evolving, these collaborative workflows are no longer a “nice-to-have” but a competitive necessity that directly impacts final product performance and client trust. For more on this, see our guide on the Benefits of Manufacturer-Client Partnerships in Construction.

Key Stakeholders and Their Roles
A well-run custom fence project operates like a symphony, with each stakeholder playing a critical part. Clearly defining these roles and their communication touchpoints is essential for a harmonious workflow. The project team typically includes the client’s engineer or architect, who defines the design intent and performance criteria. The contractor or project manager oversees the on-the-ground logistics, budget, and timeline. On the manufacturer’s side, a dedicated sales representative or project lead serves as the primary point of contact, coordinating with their internal engineering, production, and quality control teams.
Establishing a clear decision-making hierarchy is paramount. It must be understood who has the authority to approve design changes, technical drawings, and prototype samples. This prevents conflicting instructions and ensures that approvals are binding. When these cross-functional teams coordinate effectively, problem-solving is greatly enhanced. For instance, a manufacturer’s engineer might identify a more cost-effective fabrication method to achieve the architect’s aesthetic goal, an insight that can only emerge through open, collaborative dialogue. Explore our deep dive into the Roles in Construction Project Management to learn more.
Preparing the Design Brief
On a recent high-security perimeter project, our initial design brief simply specified “anti-climb features.” This seemingly straightforward requirement led to two weeks of costly back-and-forth. The manufacturer interpreted this to mean a specific type of high-density mesh, while we, the client, had envisioned a curved top rail with security outriggers. A more detailed brief, clarifying the exact anti-climb method and performance standard, could have saved ten working days and avoided significant frustration. This experience underscores a core principle: the design brief is not just a wish list but a translation document, designed to align creative intent with concrete manufacturing capabilities.
Before ever listing out components, project leaders must understand that the purpose of the brief is to provide unambiguous instructions that leave no room for assumption. It serves as the foundational agreement upon which all technical drawings, prototypes, and production plans will be built. A powerful brief anticipates the manufacturer’s questions and provides clear, measurable answers, setting a course for efficiency and precision from the very start as the single source of truth for the project’s vision.
Core Elements of a Design Brief
A comprehensive design brief is the blueprint for your custom fence. It must be detailed, precise, and all-encompassing to guide the manufacturer effectively. While every project is unique, a robust brief should always include several core elements. Performance requirements are critical, detailing factors like wind load resistance, impact strength, and desired security level. Material specifications should be exact, covering not just the type (e.g., steel, aluminum) but also the grade, thickness, and any required certifications. This is followed by clear aesthetic goals, including style references, RAL color codes, and desired surface textures or gloss levels.
Furthermore, the brief must account for environmental considerations, such as proximity to saltwater (requiring enhanced corrosion resistance) or extreme temperature fluctuations. It’s essential to list all applicable compliance and regulatory standards, from local building codes to federal security mandates. Finally, the brief must be grounded in reality with clear budget and timeline constraints. This allows the manufacturer to propose solutions that are not only technically sound but also financially and logistically feasible.

Tips for Clear Communication
Crafting a brief that a manufacturer can execute flawlessly is an art of precision. Vague terms like “strong” or “durable” should be replaced with precise technical language, such as “must withstand a 40 psf wind load” or “must meet ASTM F2781-15 standards.” Including reference images, sketches, or photos of precedent projects is invaluable for conveying aesthetic intent that words alone cannot capture. Equally important is to explicitly define the acceptance criteria. How will you determine if the final product is acceptable? Specify tolerances for dimensions, color matching standards, and functional test requirements.
A proactive approach involves anticipating the manufacturer’s questions and addressing them upfront in the brief. This might include details about site access, installation constraints, or integration with existing structures. For maximum efficiency, encourage early manufacturer feedback on a draft version of the brief. Their input on material choices or fabrication techniques can often lead to improved designs and cost savings. We highly recommend using a standardized template for design briefs to ensure no critical information is missed, a resource you can explore in our guide to Effective Client-Manufacturer Communication Strategies.
Technical Drawings and Specifications
If the design brief is the “what,” then technical drawings and specifications are the “how.” These documents are the universal language of engineering and fabrication, translating abstract design concepts into concrete, actionable instructions. Their fundamental role is to eliminate ambiguity. A well-executed set of drawings ensures that a part fabricated in one facility will fit perfectly with another made elsewhere, and that the final assembled fence meets every dimensional and structural requirement with mathematical precision. These are not just pictures; they are legally and technically binding documents that form the core of the manufacturing contract.
Essential Technical Drawings for Custom Fences
A complete technical package for a custom fence project typically includes several types of drawings. Computer-Aided Design (CAD) drawings are the cornerstone, providing 2D plans, elevations, and section views with precise dimensions, tolerances, and assembly details. These are often supplemented with 3D renderings, which are invaluable for visualizing spatial relationships, confirming aesthetic choices, and securing approvals from non-technical stakeholders. Industry whitepapers and engineering guidelines consistently emphasize that clear technical specifications are proven to improve prototype accuracy and final manufacturing quality.
The drawing set must also include specific material callouts, identifying the exact grade, finish, and treatment for every component. For fences with structural requirements, load calculations and diagrams illustrating stress points and necessary reinforcements are non-negotiable. Finally, detailed specifications for processes like welding, fastening, and surface treatments (e.g., galvanization, powder coating thickness) are required, often accompanied by a comprehensive Bill of Materials (BOM) that links every part number back to its corresponding drawing.
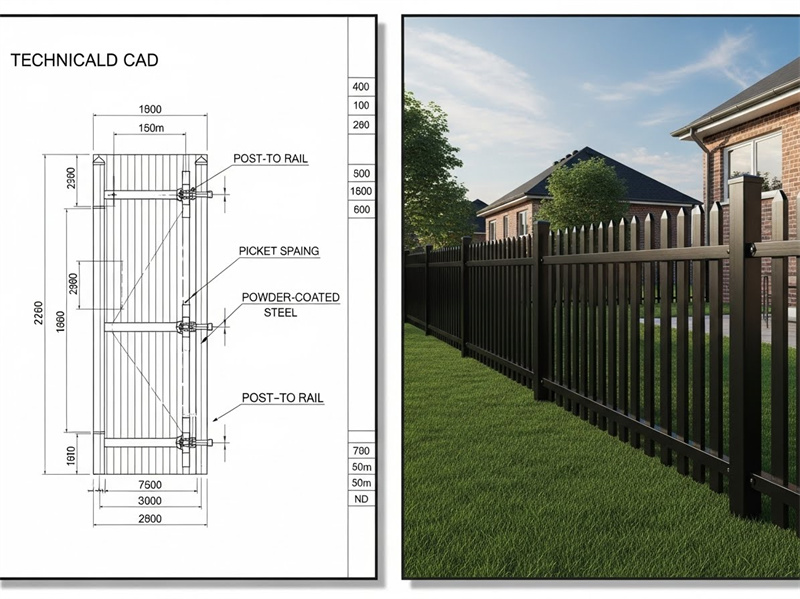
| Drawing Type | Purpose | Key Details Included |
|---|---|---|
| CAD Drawing | Dimensioned plans and sections | Measurements, tolerances, assembly instructions |
| 3D Rendering | Visualizing final product | Color, texture, spatial layout |
| Structural Diagram | Load analysis | Stress points, reinforcements |
| Material Specification Sheet | Material properties | Grades, treatments |
Common Drawback Causes and How to Avoid
Flaws in technical drawings are a direct path to manufacturing defects and project delays. One of the most common issues is ambiguous dimensioning, where a measurement is unclear or missing, forcing the fabricator to guess. This is easily avoided by having a second engineer or the manufacturer’s own team review all drawings. Similarly, missing tolerance specifications are a frequent cause of component fit-up issues during assembly. Every critical dimension should have an associated tolerance (e.g., ±0.5mm) to define the acceptable range of variation.
Inconsistent material data between the BOM and the drawing callouts can lead to incorrect procurement and the use of substandard materials. A simple cross-check can prevent this costly error. Another pitfall is a lack of detail on surface finishes; specifying “powder coat” is not enough. The drawing must note the exact RAL code, gloss level, and required coating thickness to avoid aesthetic mismatches. Finally, unclear assembly instructions can turn a smooth installation into a logistical nightmare. The best practice is to have the manufacturer’s production team review and approve all drawings before fabrication begins, ensuring the plans are not just technically correct but also buildable.
Revision and Change Management
No project plan is perfect, and change is an inevitable part of any complex custom fabrication process. The difference between a well-managed project and a chaotic one lies in how that change is handled. The core principle of formal change control is to create a structured, predictable, and documented process for managing revisions. This minimizes the risk of miscommunication, prevents uncontrolled scope creep, and provides a clear record of how the project evolved. Best practices from the Project Management Institute (PMI) confirm that formal revision and approval processes are essential for mitigating risk and keeping projects on schedule and within budget.
Establishing a Revision Process
A robust revision process starts with strict version control. Every drawing and technical document must be marked with a revision number, date, and the author of the change. Obsolete versions should be archived to prevent accidental use. The rules of engagement must be clear: define who on the project team has the authority to request a change and who has the authority to approve it. All proposed changes should be tracked using annotated “red-lined” drawings or a formal changelog that details what was altered and why.
Communication is paramount. Once a change is approved, it must be communicated promptly and formally to all relevant stakeholders, from the project manager to the shop floor supervisor. Collaborative software tools can be invaluable here, providing a central repository for the latest documents and a clear audit trail of all revisions. Most importantly, the process should record the reason for each change and its assessed impact on project cost and timelines, ensuring full transparency.

Managing Scope Adjustments
While revisions may involve small tweaks to existing designs, scope adjustments represent a more significant change to the project’s deliverables. These must be managed through an even more formal change-order policy. When a change in scope is requested—such as adding another 100 feet of fencing or changing the gate mechanism from manual to automated—a formal change order should be drafted. This document transparently assesses the impact of the change on both the budget and the project deadline.
No work on the adjusted scope should ever proceed until there is a written agreement, signed by both the client and the manufacturer, approving the change order and its associated costs and schedule impacts. In these scenarios, it’s wise to involve the manufacturer early. They can often propose alternative solutions or mitigation strategies to achieve the client’s new goal with minimal disruption. Typical scope changes in fencing projects include altering the fence line, upgrading materials for higher security, or adding new features discovered to be necessary after the initial design. Mastering this process is a key component of Change Management in Construction Projects.
Quality Metal Fences Direct from the Factory
Trust DB Fencing for durable steel picket fences, temporary barriers, and more—built to international standards and delivered fast. Benefit from expert support, competitive pricing, and a commitment to quality in every product.
Prototype Review and Approval
The prototype is the physical manifestation of all preceding documents and discussions. It is the critical checkpoint before committing to the immense cost and effort of full-scale production. The principle behind prototyping is simple: it is a powerful feedback loop that allows you to “measure twice and cut once” at an industrial scale. Investing the time and resources to produce and thoroughly review a single sample can prevent catastrophic and costly errors across hundreds or thousands of units. This stage is where the theoretical design meets the physical reality of manufacturing, and it is the last, best chance to catch discrepancies.
Planning Prototype Development
A successful prototype review begins with careful planning. Before fabrication even starts, the team must define the prototype’s goals and clear, measurable acceptance criteria. What specific questions does the prototype need to answer? Are we testing for fit, finish, function, or all three? From the outset, coordinate the early involvement of the manufacturer’s engineering and quality teams, as their expertise is invaluable. The team must also decide on the prototype’s scale: will it be a full-size section of the fence, a single panel, or a smaller functional model of a complex part like a latch mechanism? Scheduled prototype review milestones should be built into the master project timeline, with sufficient budget and resources allocated for its creation and potential iteration. Finally, communicate clear expectations for the feedback process so the manufacturer knows exactly what to expect post-review.
Conducting Effective Prototype Reviews
The prototype review meeting should be a structured, formal event, not a casual glance. Use a structured inspection checklist that methodically covers every aspect of the unit: aesthetics (color, texture, weld appearance), dimensions (checking against technical drawings with calipers), and functionality (testing gates, latches, or moving parts). All identified issues, no matter how small, should be documented clearly with high-resolution photos, notes, and specific references back to the technical drawings. It’s crucial to engage a cross-disciplinary team in the review, including the architect for aesthetic feedback, the engineer for technical compliance, and the contractor for installation-related insights. Following the review, issues should be prioritized—separating critical failures that affect safety or compliance from minor cosmetic preferences. The outcome must be a clear, agreed-upon revision plan with a timeline for delivering the next iteration or, ideally, final approval to proceed to production.

Quality Assurance in Custom Fencing
Quality Assurance (QA) is not a single event at the end of the production line; it is a continuous, integrated process designed to ensure that every stage of manufacturing adheres to the agreed-upon standards. The guiding principle is to bake quality into the process from the start, establishing checkpoints to detect and correct defects early when they are least expensive to fix. A robust QA program assures not only the aesthetic quality of the fence but also its structural integrity, durability, and long-term performance, protecting the investment and reputation of all parties involved. This comprehensive approach ensures the end product is a true reflection of the approved design specifications.
Defining Quality Standards
The foundation of any QA program is a set of clear, measurable quality standards. These go beyond the design brief to create specific acceptance criteria for every aspect of production. This includes tolerances for raw material properties, acceptable ranges for all critical dimensions, and objective standards for surface finishes (e.g., “no visible blemishes from 1 meter away,” “powder coat thickness between 60-80 microns”). These standards should be explicitly linked to recognized industry benchmarks and regulatory requirements where applicable. The plan must also define testing procedures, inspection frequencies, and a responsibility matrix clarifying who performs and who signs off on each quality task. Lastly, a well-documented plan includes procedures for corrective actions and rework, ensuring that when a non-conformance is found, there is a clear process to address it.
Inspection and Testing Procedures
Quality control is the tactical execution of the QA plan, involving several key inspection points. It begins with incoming material inspections, where raw materials are checked against purchase orders and accompanied by certificates of conformity from the supplier. During manufacturing, in-process inspections are vital; these include regular dimensional checks on cut parts, weld integrity tests, and verification of assembly jigs. As components are finished, surface finish evaluations for color consistency, adhesion, and coverage are conducted to ensure both corrosion protection and aesthetic requirements are met.
For structurally significant projects, load and stress testing may be performed on sample units to validate engineering calculations. Before any product is cleared for shipment, a final product audit is conducted, serving as a last check against the approved prototype and quality checklist. Throughout this process, implementing sample tracking and traceability practices ensures that if an issue is ever discovered in the field, the problem can be traced back to a specific batch of material or production run for swift resolution.
| Inspection Stage | Method | Frequency | Responsible Party |
|---|---|---|---|
| Material Receipt | Visual and certification review | Every batch | Manufacturer QC |
| In-Process | Dimensional checks, weld integrity | Per batch or lot | Manufacturing Supervisor |
| Surface Finish | Visual and thickness gauge | Random sample | QC Inspector |
| Final Product | Load testing, aesthetics | All units or samples | Third-party Inspector |
Effective Communication Strategies
While technical documents and formal processes form the skeleton of a project, communication is its lifeblood. The frequency, clarity, and format of communication have profound psychological and operational impacts on project success. Regular, scheduled updates reduce stakeholder anxiety and build trust, replacing uncertainty with predictability. Choosing the right format—a visual model instead of a dense paragraph, for instance—can preemptively solve misunderstandings that arise from different interpretations of text. An effective communication strategy is proactive, transparent, and multi-faceted, ensuring every stakeholder has the right information at the right time.
Scheduled Meetings and Reporting
A structured communication cadence is the backbone of a well-managed project. This should include a formal kickoff meeting to align all parties, regularly scheduled design reviews, weekly or bi-weekly progress updates, and a clear process for convening ad-hoc meetings to resolve urgent issues. Every meeting should be agenda-driven, with clear objectives, defined roles for participants, and a designated note-taker to document decisions and action items. Proactively sharing concise status and risk reports keeps everyone informed and allows for early mitigation of potential problems.
Leveraging digital project management platforms like Asana, Monday.com, or Procore can provide a single source of truth and unparalleled transparency. It is also critical to set clear expectations around response times for emails and RFIs (Requests for Information) and to define an escalation path for issues that cannot be resolved at the project team level. Incorporating simple feedback loops, such as asking “Does this explanation make sense?” or sending a summary email after a call, helps confirm mutual understanding and prevents assumptions.

Using Visual Aids and Prototypes
In complex engineering projects, a picture is truly worth a thousand words—or a thousand lines of specification text. Visual aids are powerful tools for bridging the communication gap between technical and non-technical stakeholders. Employing 3D CAD models and photorealistic renderings allows architects, clients, and project managers to see and approve the final design in a way that 2D drawings cannot convey. When discussing material finishes and precise dimensions, nothing is more effective than providing physical samples or full-scale mockups for hands-on review.
When explaining revisions or pointing out defects, annotated images with arrows and notes are infinitely clearer than a purely text-based description. For large-scale or high-value projects, emerging technologies like virtual or augmented reality walkthroughs can provide an immersive preview of the final installation. Furthermore, encouraging joint site visits during the installation phase allows for real-time problem-solving as the fence is integrated with the landscape. Investing in training all team members on how to interpret key technical visuals is a critical step in enabling this kind of rich, visual communication. Explore more on a related topic in Using Technology for Construction Project Visualization.
Contractual Terms and Legal Considerations
A well-drafted contract is far more than a defensive legal tool; it is a foundational element for building trust and a roadmap for a successful partnership. By clearly and unambiguously defining the responsibilities, expectations, and “rules of the game” for all parties, the contract reduces uncertainty and provides a clear framework for navigating the project. It transforms potential points of conflict into agreed-upon processes, fostering an environment where both client and manufacturer can operate with confidence. This clear legal framework is essential for mitigating disputes and ensuring the project’s objectives are met harmoniously.
Key Contract Provisions
Every custom fence manufacturing contract should contain several critical provisions. The Scope of Work (SOW) must be meticulously detailed, referencing the approved design brief and technical drawings to define exactly what is to be delivered. The payment schedule should be tied to tangible project milestones—for example, a percentage upon contract signing, another upon prototype approval, another upon shipment, and a final payment upon successful installation. This aligns cash flow with progress.
Warranty terms must clearly state the duration of coverage, what defects are included, and the process for making a claim. Liability and indemnification clauses allocate risk between the parties, specifying who is responsible for what in the event of an accident or failure. The contract must also incorporate the formal change order process discussed earlier and outline a pre-agreed procedure for dispute resolution, such as mediation or arbitration, to avoid costly litigation. For projects involving unique designs, clauses on confidentiality and intellectual property rights may also be necessary to protect proprietary information.
| Provision | Purpose | Typical Content |
|---|---|---|
| Scope of Work | Defines deliverables | Fence types, quantities, specifications |
| Payment Terms | Schedules payments | Installments tied to milestones |
| Warranty | Defines defect coverage | Duration, repair responsibilities |
| Liability | Allocates risk | Limits, exclusions, indemnities |
| Change Orders | Manages scope changes | Approval process, cost impacts |
Ensuring Contract Clarity
The effectiveness of a contract lies in its clarity. It should be written in clear, direct language, avoiding jargon and ambiguity wherever possible. It is always advisable to have the contract reviewed by legal counsel with specific expertise in construction and manufacturing law before signing. Prior to execution, hold a contract review meeting with all key stakeholders from both the client and manufacturer teams to ensure everyone shares the same understanding of their obligations and the project’s terms. Once signed, copies of the contract should be digitally accessible to all relevant team members. Periodically conducting compliance checks throughout the project lifecycle can help ensure that both parties are adhering to the agreed-upon terms, and if the project evolves significantly, be prepared to formally amend the contract to reflect the new reality.
Case Studies and Real-World Examples
Theory is valuable, but seeing these principles in action provides the most powerful lessons. The following real-world scenarios illustrate how structured collaboration turns potential failures into successes, allowing us to draw tangible insights from the challenges faced and solutions employed. These examples highlight how the frameworks discussed above work in practice to save time, reduce costs, and deliver superior results.
Case Study 1: Reducing Miscommunication with Design Briefs
A large commercial development project required a custom decorative aluminum fence with a complex, repeating pattern. The architect’s initial brief to the manufacturer contained only an aesthetic rendering and a note specifying “high-quality silver finish.” This led to significant misunderstandings: the manufacturer quoted based on a standard powder coat, while the architect expected a more expensive anodized finish. Furthermore, the pattern’s structural supports were not specified, causing a delay of three weeks as engineering teams went back and forth on load-bearing requirements. The project was put on hold.
To resolve the impasse, the project manager facilitated a workshop where both teams collaborated to create a new, hyper-detailed design brief. They used a standardized template that forced them to define the exact finish (Class I clear anodized), the aluminum alloy grade (6063-T5), weld specifications, and wind load requirements (90-mph exposure C). This new brief resolved all ambiguities in a single day. The measurable result was a revised, accurate quote within 48 hours and a reduction in the subsequent manufacturing lead time by 15%, as all guesswork was eliminated from the process.
Case Study 2: Prototype Iteration Streamlining
A university campus needed 200 custom automated gates, each with a unique access control integration. The initial prototype review process was chaotic, with feedback arriving from different departments (IT, facilities, security) via email and phone calls over several weeks. This created conflicting revision requests and caused the first prototype to go through four costly and time-consuming iterations, pushing the project six weeks behind schedule. The manufacturer was frustrated by the constant changes, and the university was concerned about the timeline.
The project manager intervened by implementing a structured prototype review system. A single, formal review meeting was scheduled for each iteration, and a multi-disciplinary “Gate Approval Team” was formed. They used a shared digital checklist to consolidate all feedback in one place during the meeting. Critical issues were separated from minor preferences, and a single point of contact was designated to communicate the consolidated revision list to the manufacturer. This structured process shortened the review cycle for the second prototype from weeks to just three days, requiring only one round of revisions. This streamlined collaboration not only brought the project back on schedule but also resulted in an estimated cost saving of over $50,000 by avoiding further production delays and prototype rework.
Quality Metal Fences Direct from the Factory
Trust DB Fencing for durable steel picket fences, temporary barriers, and more—built to international standards and delivered fast. Benefit from expert support, competitive pricing, and a commitment to quality in every product.
Conclusion: Collaboration Success Essentials
The journey from a custom fence concept to a successful installation is paved with communication, precision, and partnership. As we’ve explored, mastering the art of custom fence engineering collaboration is not about finding a perfect manufacturer, but about building a perfect process. By embracing a structured, transparent, and proactive approach, project leaders can transform potential friction points into opportunities for innovation and efficiency.
- Clear, detailed initial communication via a comprehensive design brief sets the foundation for project success and eliminates costly assumptions from the start.
- Formalized revision and prototype approval processes are non-negotiable systems that drastically reduce errors, manage scope creep, and keep projects on schedule.
- Integrated quality assurance throughout the manufacturing workflow, rather than as a final inspection, is the key to maintaining high standards and ensuring client satisfaction.
- Contractual transparency and continuous communication work in tandem to foster trust, align expectations, and minimize the risk of disputes.
The core takeaway is that excellence in this field is a shared responsibility, built on a foundation of mutual respect and clear processes. We encourage you to adopt these best practices and adapt them to your specific needs. This commitment to a collaborative framework is not just a suggestion, but a necessity. Ultimately, it is the surest way to ensure your next custom fence project is a resounding success.
Frequently Asked Questions
What are the most important elements to include in a custom fence design brief?
A powerful design brief must be comprehensive to eliminate ambiguity. Key elements include performance requirements, precise material specifications, explicit aesthetic goals, environmental factors, compliance standards, and realistic budget and timeline constraints. Providing this level of detail upfront prevents costly misunderstandings and ensures the manufacturer understands the full scope of your vision.
How do I ensure my technical drawings are accurate and useful for manufacturers?
To ensure accuracy, use standardized CAD drawings that provide clear dimensions, specified tolerances, complete material callouts, and detailed assembly instructions. The most effective practice is to coordinate an early review of all drawings with the manufacturer’s engineering team. This collaborative check confirms the plans are not only accurate but also practical for fabrication, preventing costly errors down the line.
What is the best way to handle revisions during custom fence manufacturing?
Establish a formal revision process from the outset to manage change effectively. This system should include strict version controls, defined approval authorities, and a changelog for documenting the reason for each revision. This structured approach ensures all stakeholders are promptly informed and prevents confusion from outdated information.
How can I effectively review and approve a fence prototype?
An effective prototype review starts with clearly defining its goals and acceptance criteria. During the review, use a structured inspection checklist to methodically assess aesthetics, dimensions, and function against the technical drawings. It is also crucial to engage a cross-disciplinary team for comprehensive feedback and to document all findings thoroughly for the manufacturer.
What quality assurance steps should be followed in custom fence projects?
An effective QA plan begins by defining measurable quality standards that reference industry norms. Key steps then involve conducting inspections at multiple stages, from receipt of raw materials to in-process fabrication and a final product audit. Maintaining clear documentation throughout this process is crucial for traceability, accountability, and ensuring consistent quality.
What contractual terms are critical when working with fence manufacturers?
Your contract should, at a minimum, include a detailed scope of work, a milestone-based payment schedule, clear warranty terms, liability clauses, and a formal provision for managing change orders. A dispute resolution clause is also highly recommended to avoid costly litigation if disagreements arise. Before signing, ensure the contract is reviewed by legal counsel with construction expertise to protect all parties.
How can I maintain effective communication throughout the project?
Schedule regular, agenda-driven meetings for progress updates and design reviews. Use a shared project management tool to track tasks and communication. Leverage visual aids like 3D models, renderings, and physical prototypes to clarify complex details and ensure everyone shares the same vision. Finally, set clear expectations for response times to keep the project moving forward.


